

==================
Affiliate Statement
Best Baking Tips is supported by our audience. When you purchase through one of our links, we may earn a small affiliate commission. As an Amazon Associate I earn from qualifying purchases. Your cost is not affected.
==================
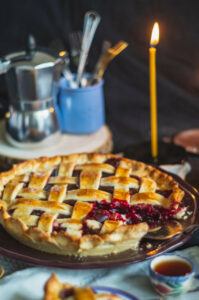
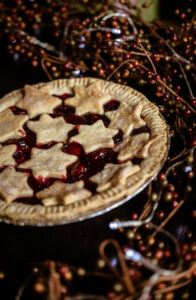
Classic Double Pie Crust Recipe
There are probably as many versions of a double pie crust recipe out there as there are bakers. Many of us struggle with pie crust; I used to. This recipe helps you develop that perfect pie crust every time. If you need a single crust, follow this recipe.
As you create this for the first time, remember to follow the quantities and times exactly. You may need to adjust your flour or water at the end of the mix, but avoid too much. Remember baking resembles chemistry. Your proportions lead to success or failure.
After following our double pie crust recipe a few times, bakers develop a sense of what works and what doesn’t. Then you might choose to vary slightly from the basic framework. For now, for an easy-to-roll, buttery, and flaky reliable crust, follow our recipe to success.

Double Pie Crust Recipe
Ingredients
- 2 1/2 cups flour or pastry flour
- 1 1/4 tsp salt
- 1/4 cup shortening or add more butter
- 10 tbsp unsalted butter very cold; you may use vegan butter, if desired.
- 1 tbsp lemon juice or vinegar
- 8 tbsp water icy cold, 8-10 tbsp total; a bit less with pastry flour
Instructions
- Measure flour into a medium-sized bowl by carefully spooning into the cup and leveling each cupful. Be careful not to pack it down.
- Add salt to flour and whisk briskly to mix.
- Using a pastry cutter or a fork, cut in the shortening. Combine to create a mixture that resembles coarse sand.
- Cut the butter into very small cubes and add to the flour. Use the pastry cutter to combine into a crumbly mixture. Be careful not to over mix. It should have larger and a some smaller pebbles. If you over-mix, it will become more smooth, creating a tough, mealy crust that is not flaky.
- Mix the lemon juice with half the water and drizzle over the flour mixture. Gently toss to combine.
- Add remaining water, a little at a time, until it forms a chunky mass that holds together but is rather dry. Avoid adding too much water.
- Transfer the mixture to a piece of parchment paper. Press it into a rectangle and fold the dough into thirds. Spritz any dry areas with cold water. Flatten and fold again, repeating the process until all stray bits of dough have been incorporated. This creates a more flaky layers in you finished pie crust.
- Divide into two balls about the same size. Flatten each into a round disk no more than 1-inch thick. Wrap separately in plastic wrap or put in container with a lid. Chill for about 30 minutes
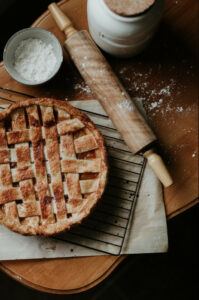
- Remove one crust from the refrigerator, unwrap, and roll into a circle larger than the size of your pan. For a 9-inch pie, you will need a 12-inch circle. Use extra flour to ensure it does not stick to your rolling mat or counter, also adding flour to your rolling pin.
- Spray your baking pan lightly with non-stick baking spray or lightly oil the bottom and sides.
- Put the crust into the pan, stretching it across the bottom and up the sides. An easy way to move your crust is to fold it into quarters, then gently lift into pan.
- Remove the second crust from the refrigerator and roll in the same way to create the top crust.
- Add filling, then place top crust on the pie.
- Trim crust edges using your kitchen scissors or pinch off. Crimp edges together using either your fork or your fingers to create a complete, attractive edge.
- For the flakiest crust, refrigerate your pie for about 30 minutes before baking.
- Just before baking, brush the crust with an eggwash, milk, or water. This step is optional, but makes a nice sheen to your crust.
- Before putting in the oven, cut a series of 3 to 4 slits in the top crust to allow steam to escape. Some bakers like to create a decorative design, rather than the parallel slits.
- Bake according to the directions for your pie. Use foil or pie edge covers to prevent the edges from burning.
Tips for making the perfect pie crusts:
- Avoid a soggy bottom crust. To keep the bottom crust from getting soggy, brush it with egg white or melted butter, or lightly oil. Then chill before adding the filling.
- Avoid the shortening. You may substitute all butter for the shortening. Just make sure it is very cold.
- Vegan butter may also substitute.
- Make sure the butter or fat you are using is very cold.
In fact, you may even want to freeze it for 10-15 minutes before starting. The colder the fat in your dough is when it hits the oven, the flakier your crust will be. Keep all of your ingredients as cold as possible. Many bakers keep their flour into the fridge or freezer, too. And then, even after rolling it out and putting it in the pan, put it back into the refrigerator before filling. - Keeping larger pieces of fat in your flour mixture is OK as that will allow for flakiness.
Remember those pockets of fat develop into perfect little pockets of air and flaky bits when they hit the hot oven. At least, they will if they are cold. Seeing little bits of fat in our dough is the ultimate perfection. They show your skill! - Use only enough water to allow the dough to hold together when pinched with your fingers.
Too much water will make your dough tough and lose its tender, flaky magic. Use enough, just enough, but no more. - Before rolling the dough out, shape it into a disk that is less than or about 1 inch thick as this will help make it easier to roll out.
Mix up the dough, shape it into a disk, then store it in the fridge until you need it. Some bakers keep their disks ready in the freezer until they need them. I will often mix up my dough and then shape it into a disk before storing it in the fridge. Then, simply thaw it enough to roll out to the needed size. Because it is already in a disk shape and partly rolled, you don’t have to roll it as much. That keeps it cold and helps avoid over-working the dough.
The cold truth in our double pie crust recipe
- Chill the dough before rolling it out.
Hopefully, by now you understand the need to keep the dough cold. Chilling the dough before rolling it out will also protect your crust from becoming overworked and chewy. - Rotate the dough 30 degrees at a time to make sure it not sticking.
Have you seen the way pizza makers throw pizza dough in the air as they stretch it? You want to do something similar, but on the counter. Roll it a bit, turn it, roll it a bit, turn it. This keeps it from sticking. It also keeps your circle from becoming oblong. - Roll out and away from yourself keeping even pressure as you work.
Go from the middle to the outside, away from you. Turn the dough and do it again. Keep the pressure even. - Don’t force or push the dough into the corners of the pan.
In fact, ease the dough into shape. You should just let it “fall” or it will go back its original shape during baking. When you put the filling on the top of the crust, it will push the crust into the nooks and crannies. Also, trim the edges off your crust after you fill it. - Chill before filling the crust so it keeps its shape during baking and the fat is super cold before hitting the oven.
Put the crust into the pan and pop it back into the refrigerator until you are ready to add the filling. - Consider adding an egg yolk even if the recipe doesn’t call for it to help keep the dough pliable.
One baker’s secret is the egg yolk. It can save those early attempts for the perfect crust. In time, with practice, you won’t need it. But use it when you need it. It makes a big difference! - Add 1 tablespoon of vinegar or lemon juice to keep the crust more tender, if there isn’t one in the recipe.
This is actually very important! Remember, baking is a science. That tablespoon of acid makes your crust more tender. Of course, you can bake without it. Many recipes don’t include it. But try it and see if it works for you. - Try to use your fingertips to handle the dough rather than the palm of your hands.
In fact, touch your pie crust as little as possible. Warm fingers work against that very cold dough we need. Use your fingers only as much as necessary.
Use the right equipment for our double pie crust recipe
- A heat-resistant glass pie pan is recommended for a flakier crust.
Glass is best. You can buy aluminum pans and even coated pans. But, if you are going out to use the pie pan,.. a glass one is the one you need to use. - Cover the edges with 2-3 inch wide strips of foil to keep the edges from getting overly brown.
Those pie crust edges will be the reason you pull your pie out before the crust is fully baked. You’ll see them get all toasty brown and freak out about them burning. Cover them so they won’t overbake and then you can leave the pie in as long as it needs. Note: you can also buy reusable plates to use instead of foil. - To make your pie shine, brush with an egg wash before baking.
An egg wash, just before baking, creates that shine, that finishing touch. Milk will often do the trick. But, there is nothing like a good egg wash on top of your pie to make it look absolutely amazing! You’ll be hooked.
And into the oven, it goes
- To ensure your oven is hot enough, start baking at 425 then reduce after 30 minutes.
Don’t put your pie in until the oven is preheated. You do NOT want to put your pie into an oven that is still warming up. That will completely undo all the work you did keeping it cold until it hit the oven. Get that oven good and hot so when the pie hits the oven, your crust immediately does its thing. - Bake until it is fully brown, not just golden brown.
That flaky crust won’t happen if you under-bake it. Go on the side of over-baked, please. Nice and brown is what you are aiming for. Anything less and you will be disappointed. However, avoid burning your crust! - Use a lot of flour to roll out your dough to keep it from sticking, but be sure to brush the excess off before baking.
A pastry brush works quite well to brush off excess flour if needed. Although a little extra flour helps to roll out the dough, it will affect the fat to flour ratio. So, brush off as much as you can.